Idiosyncrasies aside this is roughly applicable to any instrument of the guitar family. Of course when working on shorter scales such as mandolins then the measurements quoted need to be decreased accordingly.

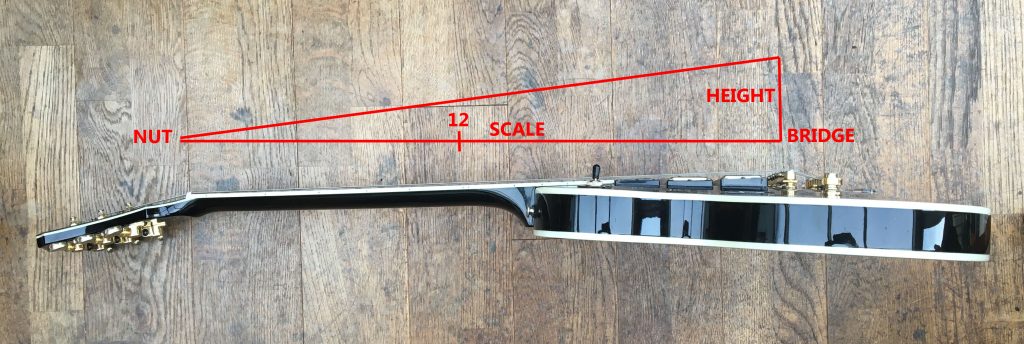
The above diagram sets out the most important elements of guitar geometry:
Guitar Setup Elements
- Nut is the termination of the strings at the headstock, string height here is controlled by the depth of the string slots in the nut
- Bridge is the termination of the strings on the body, string height (marked Height) here is controlled by saddle height
- Scale is the full length of the string and the angle of the neck in relation to the body. This length is controlled by intonation adjustment.
- 12 is the position of the 12th fret which is half way along the scale and where action is measured
- neck relief is the slight upward curvature of the neck towards the nut; this is controlled with the truss rod.
This may look like a simplification but there is not much more to consider when setting up a guitar. The only tools you need are a 500mm straight edge (a good quality engineering rule will suffice), a string height gauge or ruler with 0.5mm divisions, some feeler gauges and a set of nut files. You will need to be able to measure to 0.1mm. This is my process and the following assumes that the frets and neck angle are in good order and do not require levelling and the neck is fitted with an adjustable truss rod:
Guitar Setup Method
- Fit strings and bring up to full tension
- Lay the straight edge onto the frets between the D and G strings. Adjust the truss rod until the neck is as flat as possible – positive neck relief will show as a small gap between the frets and straight edge around frets 7-12, negative relief will show as a rocking motion of the straight edge between frets 1 and 12 – hold the straight edge around fret 12 and gently tap it above fret 1. If you can hear the straight edge tapping fret 1 then the neck has negative relief (is back bowed) and the truss adjuster will have to be turned anticlockwise until the neck is flat.
- measure the string height at fret 12. A steel strung acoustic should have a range of 1.5-2.5mm, an electric guitar should have a range of 1.2-1.7mm. The top E should be proportionately lower than the bottom E. If the bottom E is around 1.5mm then the top E should be around 1.0mm. If the strings are too high the instrument will feel clumsy and unplayable; if the strings are too low you will hear fret buzz and choked notes. Electric guitars have saddle height adjustment screws for this, with a few exceptions acoustic guitars are adjusted by filing or shimming the underside of the saddle. Because of the geometry the adjustment at the saddle is twice the desired change at fret 12. If I want to reduce action at 12 by 1mm then I will remove 2mm (or just under to play it safe) from the saddle.
- Check the string height at fret 1. This should be around 0.4mm under the bottom E and 0,2mm under the top E. If they are higher then the nut slots need to be filed deeper, if they are too low (causing string buzz on fret 1) then the nut needs to be shimmed up or remade. I don’t find feeler gauges very useful for this because they tend to push up the string. These measurements are intended as a guide only and I largely do this by eye. Another good method is to file the nut slots down until all the strings gently buzz on fret 1 and then to shim up the nut by a known amount; I like to use standard business cards which are around 0.25mm thick (check this with callipers), the right height adjustment for this. A small drop of superglue on the nut will help to hold it in place.
- Test every note on the fret board. Don’t forget to use note bends as well as these require slightly more string height and relief. If any of the notes buzz then action or neck relief need to be raised.
- the neck can now be tuned to a players style with the truss rod. More heavy handed players and those bending a lot of notes will require slightly more neck relief so slacken the truss rod in 1/8th turn increments until the desired position is achieved.
- If it is an electric guitar intonation can now (hopefully) be adjusted. this sets the string length. I use an electronic tuner to ascertain whether I am getting a perfect octave on the 12th fret on each string, this may not be possible to adjust perfectly, especially on guitars that do not have individual intonation adjustment. More heavy handed players will get sharper notes by applying more pressure so intonation will need to be set slightly flatter. People talk about adjusting intonation for multiple frets but this is largely pointless as only one adjustment is available.
Some things to consider
- It is valuable to understand how to set up your instrument but bear in mind someone who does 200+ setups a year will have an easier time achieving good results.
- If you aren’t confident then work in increments rather than trying to achieve your adjustment in one hit.
- The frets have to be in good order. If there is any amount of fret wear or any of the frets are sitting high this will seriously limit the achievable results.
- Adjusting neck relief on a neck with no truss rod is a very complex matter and should not be tackled by a novice
- Your setup needs to be changed if you change string gauges or tuning and no adjustments should be made without the neck being under tension.
- If sufficiently low action cannot be achieved then the instrument may need a neck reset or belly repair to correct the neck angle.
- Be prepared to adjust your truss rod regularly with changes in weather, especially for instruments set up with very low action.

